Color Patch
Color Is a Surface, Not a Volume
When you paint a face of a model in a multi-material slicer, the slicer does something that sounds reasonable and is actually quite wasteful: it takes the entire painted region of the model and assigns it to the painted filament - not just the skin you can see, but the whole solid body underneath it, all the way in. The color you chose gets buried. A red patch on a white model is red all the way through, but you only ever see the outermost fraction of a millimeter of it. Everything behind that first layer is red plastic doing a structural job that white plastic could have done just as well.
Color Patch mode changes this. The painted color is applied as a shell - a defined number of perimeter loops on the visible surface - and the interior behind it stays base material. The part looks the same or better, and it uses a fraction of the colored filament.
| Original mode | Color Patch mode | |
|---|---|---|
| Painted region gets | The whole solid volume | Only the outer shell loops |
| Interior material | Painted color | Base color |
| Colored filament used | High | Low |
| Visible result | Baseline | Identical to more accurate |
Mixing Texture, Not Just Color
The most interesting thing Color Patch unlocks has nothing to do with color. It is that the shell and the core can be different materials.
Consider an axe prop - the Star Orbit Judgment Axe, a model by Ted_k on MakerWorld (source 1, source 2).
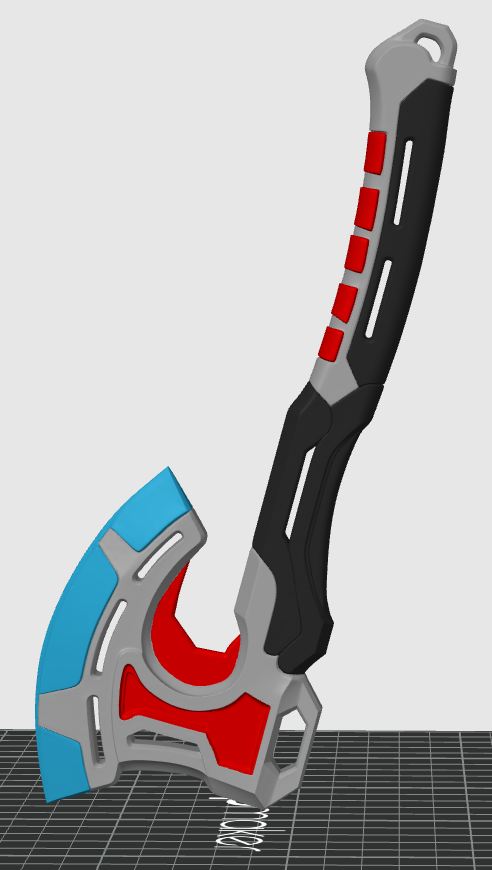
Assume you want to give it more color and texture by painting it roughly as shown here: a gray body, a black grip along the handle, a blue blade edge, and red accents set into the head and handle.
Say you want the grip to be soft-touch TPU and the body to be rigid PETG. In Original mode you cannot do this. Paint the grip TPU and the handle PETG and each one occupies a solid region sitting next to the other - and TPU does not fuse to PETG. The two regions simply will not stay together. The part delaminates along the boundary you painted. Also the blue edge will be a solid edge by itself, and this axe loses its gray edge.
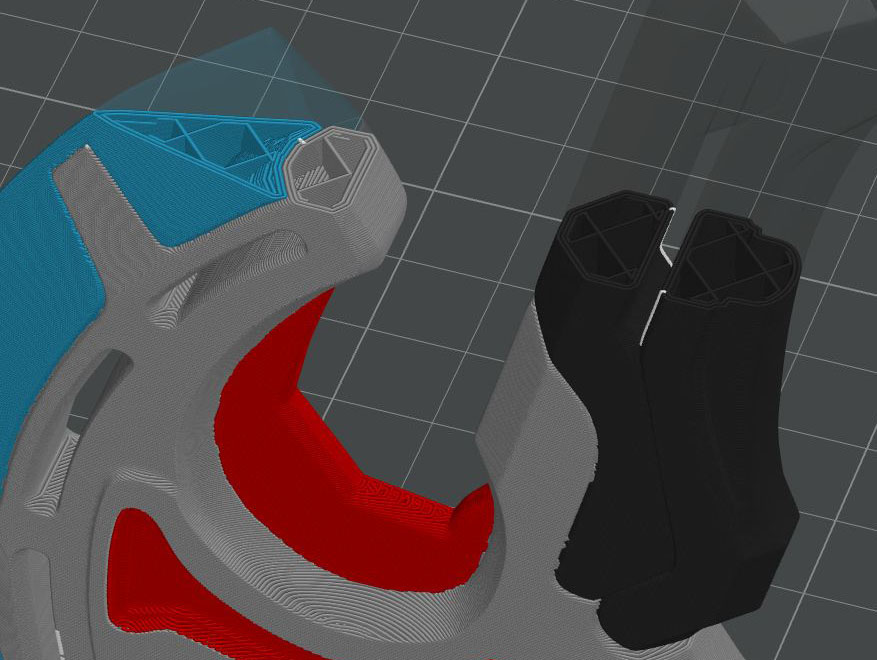
Color Patch solves it by changing the geometry of the relationship. Build the same axe like this:
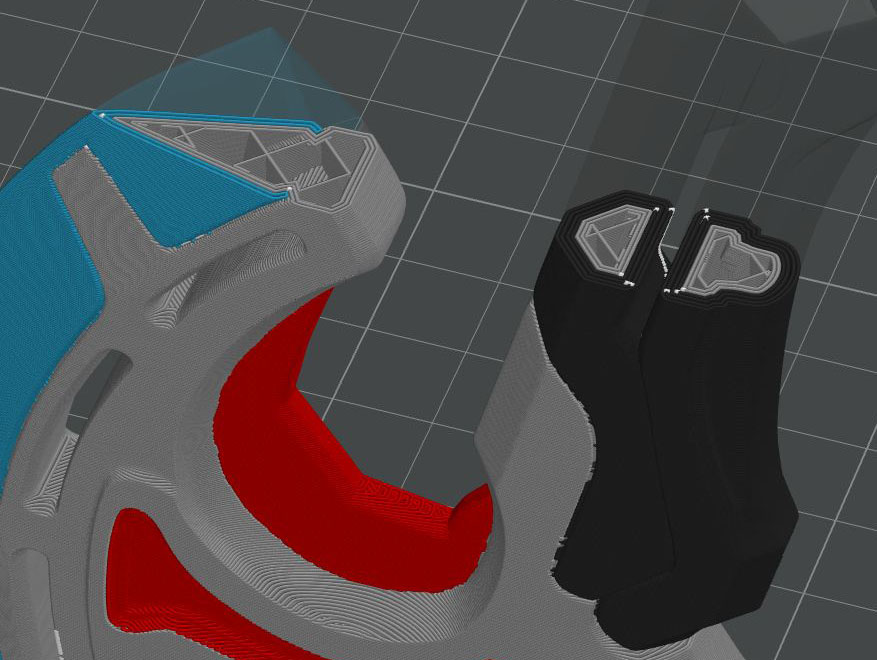
| Region | Material | Mode |
|---|---|---|
| Base / core | Metallic PETG | - |
| Grip | Black TPU | Color Patch |
| Edge / blade | Translucent blue UV-reactive PETG | Color Patch |
| Red inlays | Clear red PETG | Original |
| Infill | Base material, decorative pattern | - |
Now the black TPU grip is not a region beside the handle - it is a shell wrapping a metallic PETG core. It is held on mechanically, by geometry, not by a thermal bond that was never going to form. The grip is soft to hold and structurally sound. The translucent blue edge glows in low light while still showing the metallic core through it. The red parts, left in Original mode as solid volumes, read as gem inserts rather than as surface paint - which is exactly what you want them to be. And the infill pattern, visible through the translucent regions, becomes part of the design.
The print is now functional and purposeful, not just multicolored. None of this requires different nozzle sizes - every part of it works with four identical nozzles. It is Color Patch mode alone.
The See-Through Problem
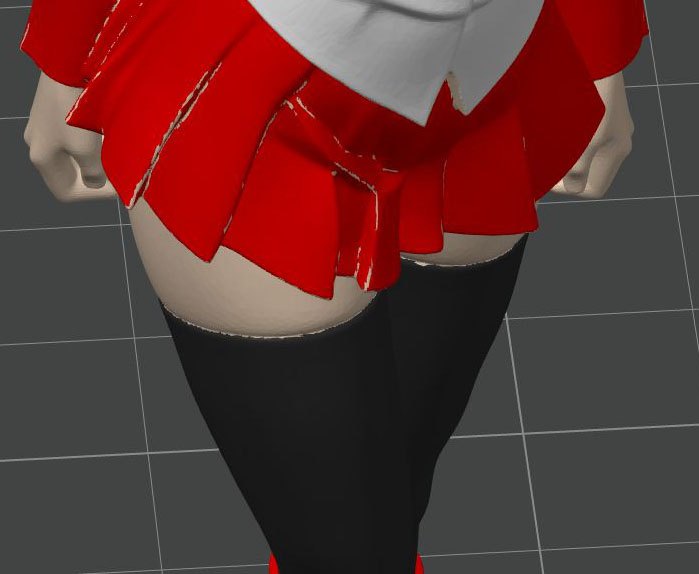
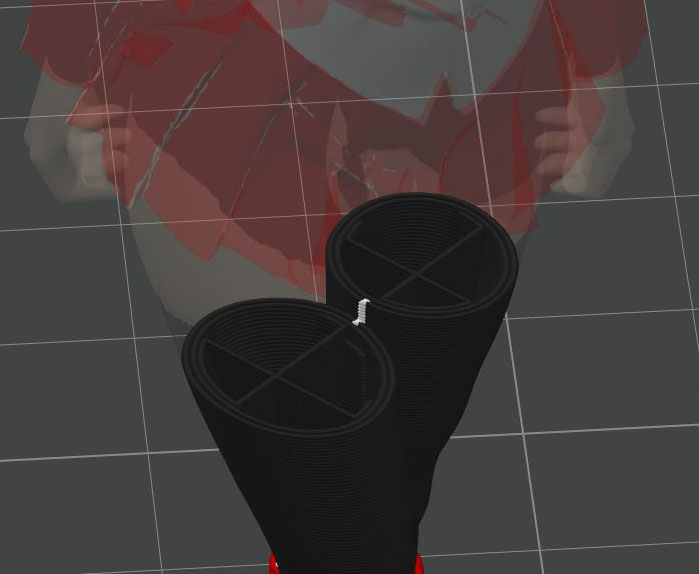
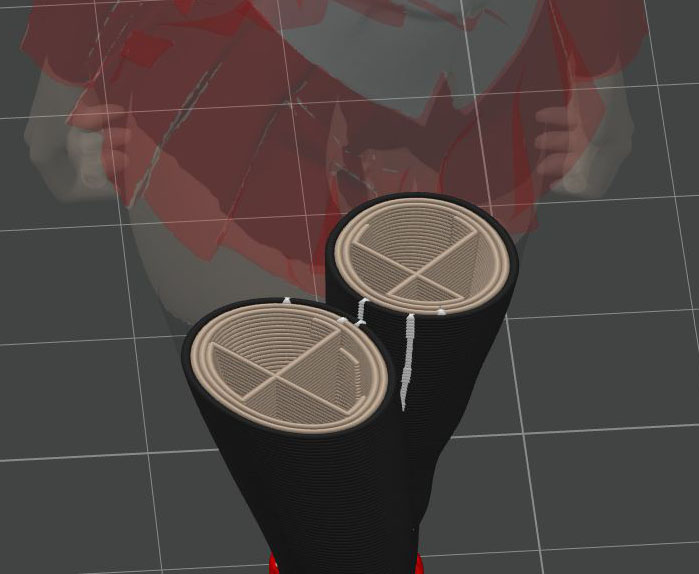
Take a character model with a thin legging. Paint it black in Original mode and the painted region uses black filament all the way through - the leg inside the legging is a solid black volume, with no skin-colored filament in there at all. The legging is not clothing on a leg; it is a "solid" black leg. Color Patch changes what the paint means: paint the legging with a translucent filament - and, if you want, print that filament on a 0.2 mm nozzle for a thinner shell - then set CL to 1 or more until you get the amount of see-through you want. Now the legging really is a layer over a skin-colored leg, and the skin reads through it the way fabric behaves in reality.
Anime girl figure, a model by I know U on MakerWorld (source 1, source 2).
 |
 |
 |
|---|---|---|
| A painted character, for illustration | Original painting prints the legs black all the way through | Color Patch paints a shell in black, and the rest in skin / base material |
Current limitation: each painted region on an object can carry only one mode and one CL setting. Finer control - a different CL per painted area on the same object - needs either deeper integration with FullSpectrum or treating painted areas as separate objects. Both are being considered.
CL - Color Loops
CL is the one number you tune. It is the number of perimeter loops the painted color occupies, counting inward from the visible surface. CL = 1 is a single loop, the thinnest possible color skin; higher values give thicker color and more opacity. You set CL per painted extruder, per object, on the slider in the multi-material paint panel - two objects on the same plate can carry different CL values, and each painted color on a single object can carry its own.
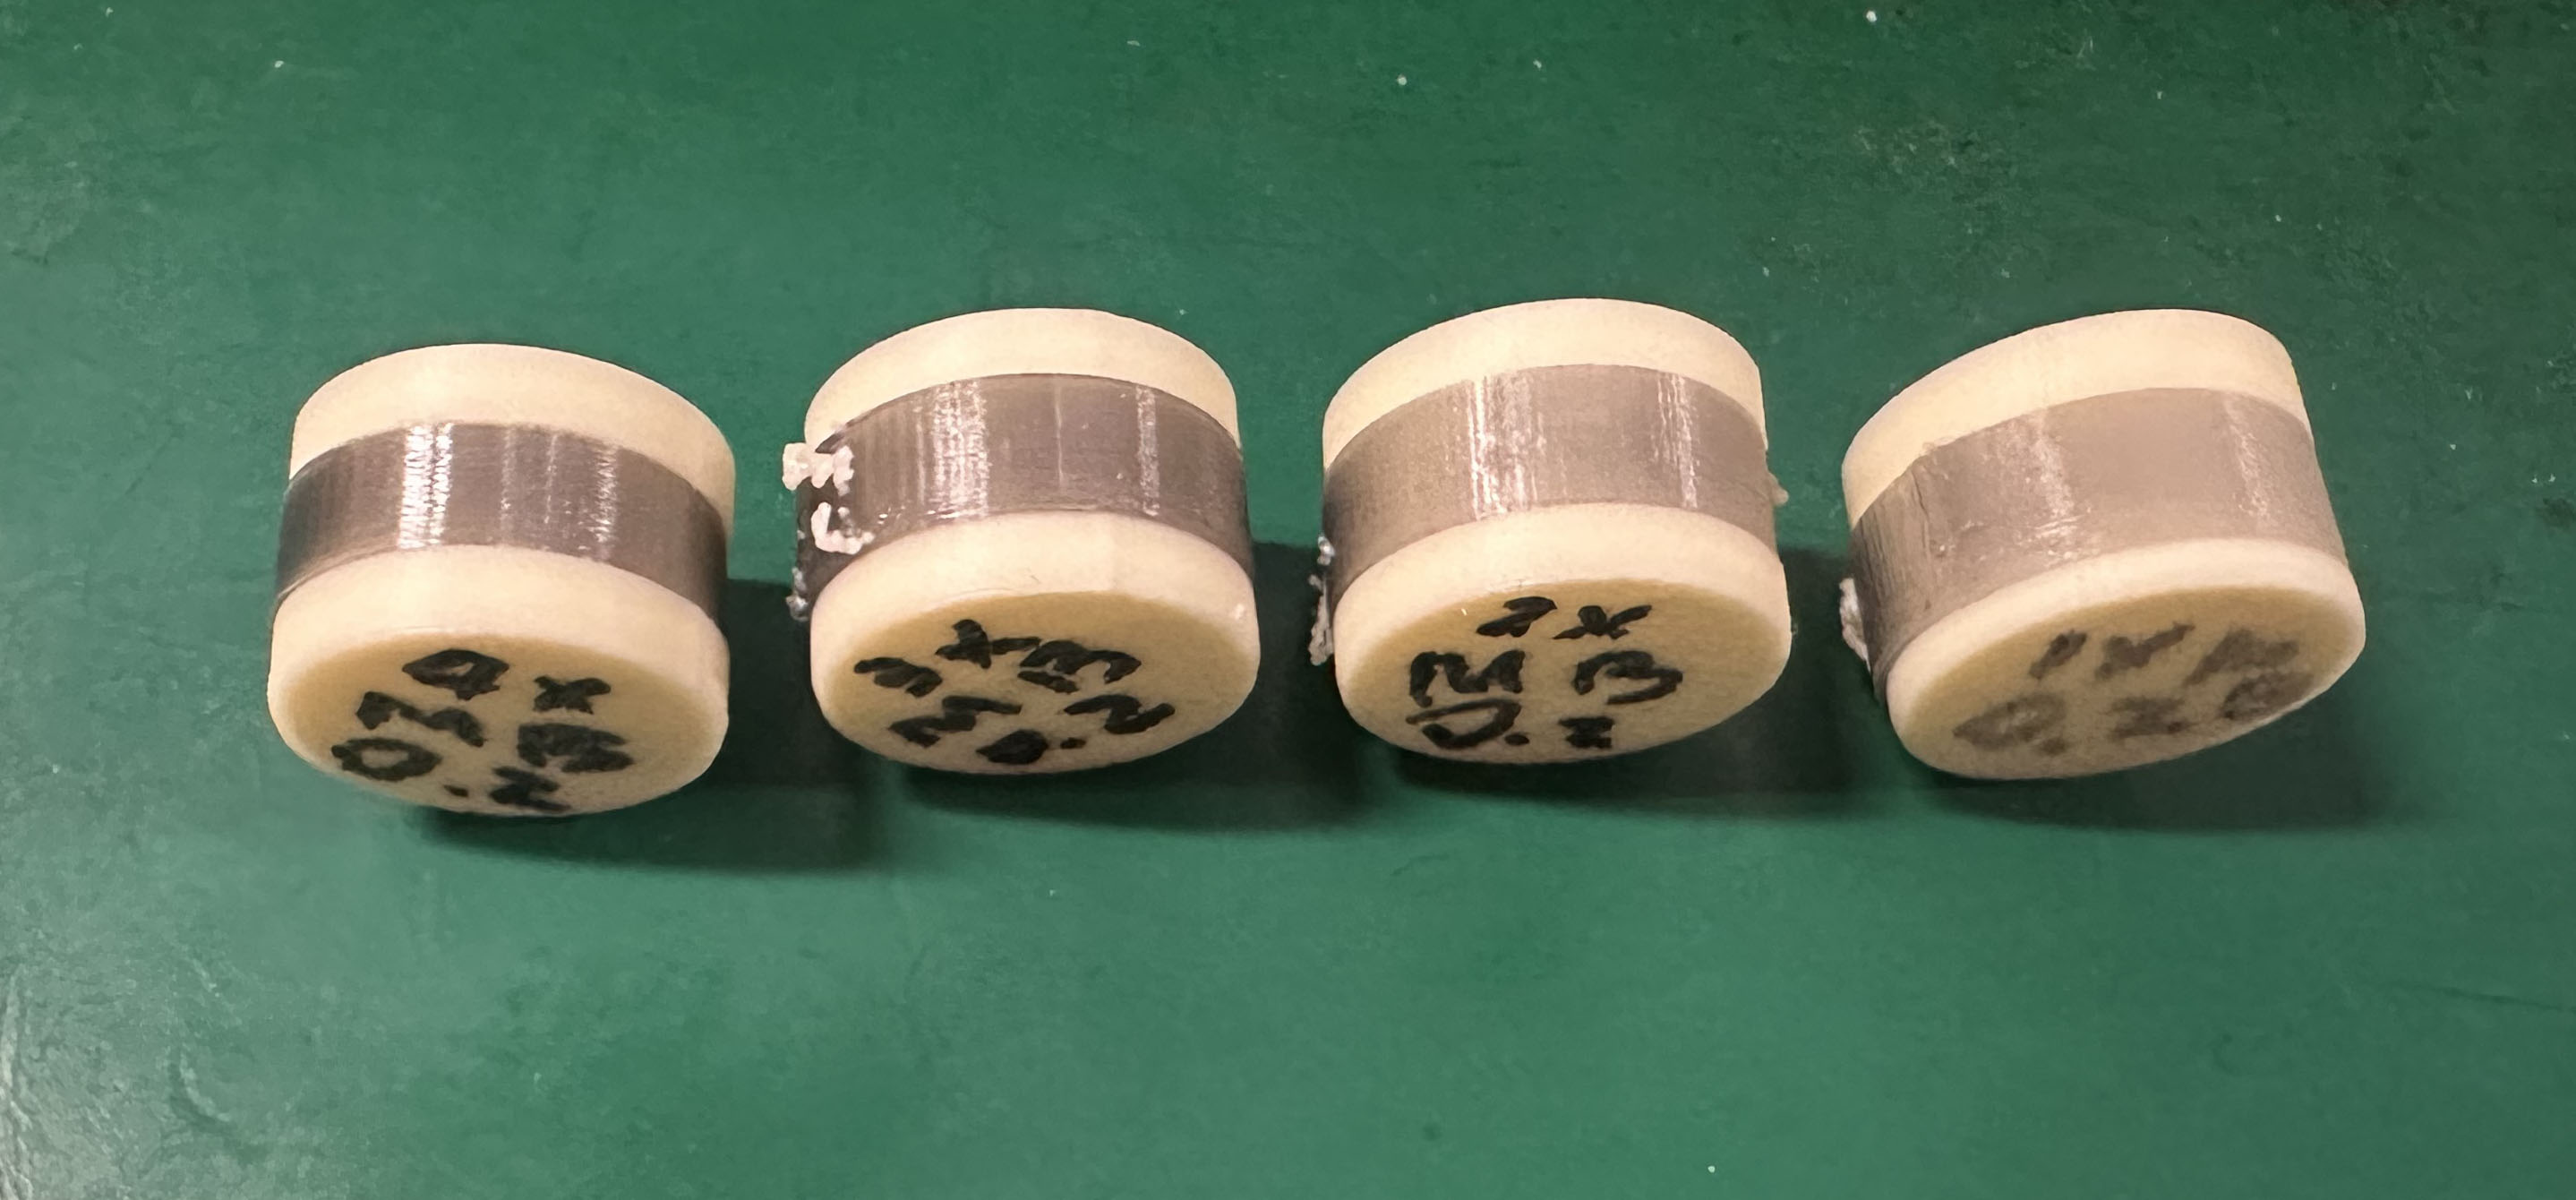
0.2 mm nozzle with translucent gray PLA as the Color Patch, 0.4 mm skin-color PLA as the base, on a 15 mm diameter cylinder.
| CL = 4 | CL = 3 | CL = 2 | CL = 1 |
|---|---|---|---|
| Diminishing return at this setting | Dark gray legging | Gray legging | Light gray legging |
* To achieve a more legging-like see-through effect, a dark translucent filament is needed.
** See-through effect varies with the color and translucency of the filament - some experimentation is required to find the optimal combination.
*** Because loop width follows the painted nozzle's own flow values, CL is not a fixed thickness. CL = 1 on a 0.8 mm nozzle is four times thicker than CL = 1 on a 0.2 mm nozzle. Think in loops, not millimeters.
Original Mode Is Still the Default
Color Patch is opt-in. Every painted extruder starts in Original mode, and in Original mode FOrcaSlicer produces G-code identical to stock OrcaSlicer - this is verified by G-code diff, not by eye. Nothing about your existing painted projects changes unless you turn Color Patch on.
The paint panel has two buttons per extruder:
| Button | Behavior |
|---|---|
| Original | Stock OrcaSlicer painting. Painted region is filled solid with the painted color. |
| Color Patch | FOS shell mode. Painted region becomes CL loops on the surface, base material behind. |
Switching either button, or moving the CL slider, resets the slice button state. It does not re-slice on its own - click Slice plate or Slice all to see the change.
Side Walls vs Top and Bottom Faces
Color Patch treats vertical and horizontal painted surfaces differently, because they are different.
On side walls the painted color gets CL perimeter loops. There is no infill inside the patch: the loops are the patch, and the base material fills in behind them. This is the shell behavior described above.
On top and bottom faces there is no "behind" to hide in. If a top face were only CL loops, you would be looking straight down at base-colored infill through a colored ring. So on the top and bottom shell layers, the painted color takes the full exposed face and slices it normally - natural perimeter loops plus solid infill, all in the painted color.
That means the thickness of the color on a top or bottom face is not governed by CL. It is governed by your top shell layers / bottom shell layers settings. The current release does not enforce a top or bottom thickness equal to CL x nozzle diameter - the two are independent, and you should set the shell thickness deliberately if the depth of color on a flat face matters to you.
Top and bottom Color Patch faces are also subject to the same settings as any other top or bottom surface: they take on the top surface pattern / bottom surface pattern, and they are affected by the only one wall on top surfaces and only one wall on first layer toggles.
The staircase at the boundary
Where a painted region wraps from a side wall over onto a top face, the transition between "CL loops" and "full solid face" happens layer by layer, and the boundary can show a slight staircase. This comes from how the solid-shell region is propagated downward through the layers - the same mechanism stock OrcaSlicer uses for any multi-material top shell. It is not specific to FOrcaSlicer and not a regression.
What it should be: the boundary between two colors meeting at an edge should follow the bisector of that edge - the angle that splits the difference between the two surface normals, the way a mitre joint splits a corner. That would give a clean diagonal seam instead of a stepped one. Implementing this requires the slicer to track which layers have given up area to a painted region, which is planned work - see Known Limitations.
In practice, on flat-faced parts, the staircase is small and often invisible. On steeply angled painted boundaries it is more noticeable.
Guardrail: You Cannot Color Patch the Outer Wall Nozzle
If you select the nozzle that is already assigned as Outer Wall and try to switch it to Color Patch, the button is disabled - and this is not an arbitrary restriction. Color Patch means "this color owns the outer N loops of the surface", but the Outer Wall nozzle already owns the outer loops of the entire model. Color Patch on the OW nozzle would just be describing what already happens. The button is grayed with a tooltip explaining why, and the extruder auto-reverts to Original mode.
What to do instead: assign the color you want as a patch to a different nozzle - one not carrying the outer wall - and paint with that.
See Technical Guardrails for the other guardrails.
Known Issues With Color Patch
- Seams at arc endpoints (CL = 1). With seam position set to Nearest or Aligned, a single color loop can show a visible artifact where the loop closes on a curved surface. Workaround: set seam position to Random.
- Curved surfaces. On spheres, cones, and cylinders, Color Patch may fall back to the older wedge-shaped behavior rather than clean shell loops. Flat-faced geometry is the tested and reliable case.
- Color boundary staircase at top/bottom transitions, as described above.
- Occasional sync on a freshly painted object. If a newly painted object does not update after switching modes, toggle Original -> Color Patch once.
Full list and status: Known Limitations.